Eclipse安装JRebel6.4.8热部署插件教程
我们用eclipse开发时经常遇到一个麻烦的问题是修改类文件后需重启tomcat才能生效,即使使用一些tomcat插件,有时修改了方法名或添加了类,也需要重启。使用获得jolt大奖的作品jrebel,就能轻松实现 jvm热部署,Rebel 可快速实现Tomcat的热部署,最为强大的是支持Spring注解的热部署,这样就能节省大量的服务器重启时间,提高了个人开发效率。JRebel支持Eclipse和IntelliJ IDEA,下面分别从两个IDE介绍JRebel的安装方法,如有错误或遗漏,欢迎指出。PS: 改properties\xml无效,这是要手动重启的。
安装方法
1.Eclipse安装JRebel
破解:Crack:
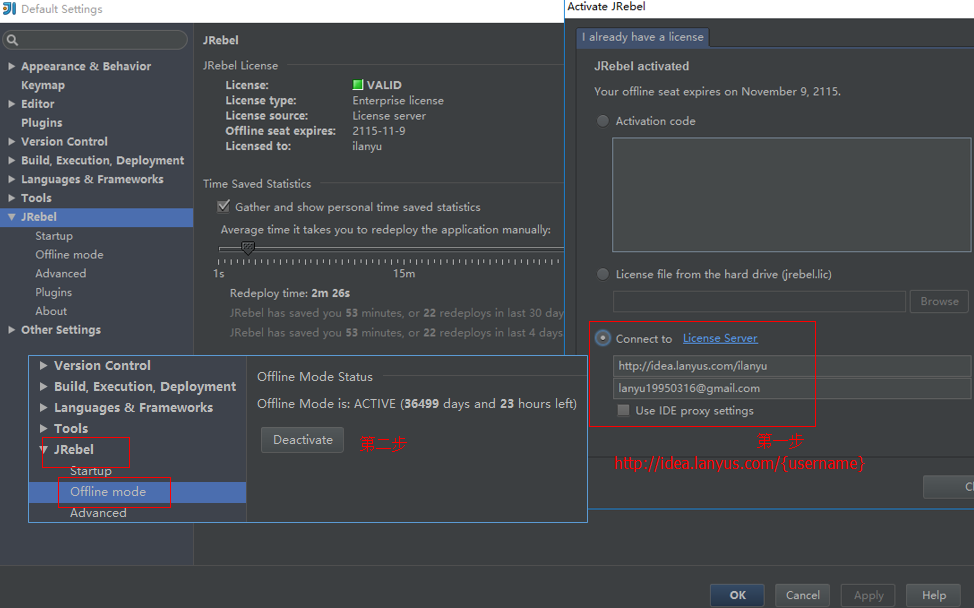
- 使用授权服务器:Help > JRebel Activation > I already have a license > Connect to License Server
- 手动:打开Eclipse目录:plugins/org.zeroturnaround.eclipse.embedder_*
分别替换 jrebel,jr6/jrebel 文件夹里的jar文件为破解后的jar文件,将证书放到用户文件夹的 .jrebel 文件夹下,例如 ~/.jrebel/。
回到Eclipse,选择Help -> JRebel Configuration 打开jrebel的配置中心,到Advance里设置JRebel agent为JRebel 6 Agent。
如果Jrebel提示没激活,请手动选择一下注册证书的路径。
设置好之后,在已有项目上右键 -> Jrebel -> Add Jrebel Nature,然后源码目录就会生成一个 rebel.xml 文件,设置成功。
2.IntelliJ IDEA安装JRebel插件:
以下步骤基于IntelliJ IDEA 16,其他版本大同小异。
- File -> Settings -> Plugins -> Browse repositories…查找 JRebel for Intellij 并安装。
破解:Crack:
- 使用第三方授权服务器:
- 还是那句话,如果JRebel给你节约了大量时间,而你又的确喜欢这款软件,请买正版支持一下。
- 手动:
打开插件目录:C:/Users/<当前用户>/.IntelliJIdea16/config/plugins/jr-ide-idea/lib,或者 ~/.IntelliJIdea16/config/plugins/jr-ide-idea/lib。
分别替换 jrebel 和 jrebel6 里边的jar文件为破解后的jar文件,并将注册证书放到 C:/Users/<当前用户>/.jrebel/ 文件夹下,或者 ~/.jrebel/。
回到IntelliJ IDEA:File -> Settings -> JRebel,确认一下注册状态,然后到 Advanced 选择JRebel 6 Agent。
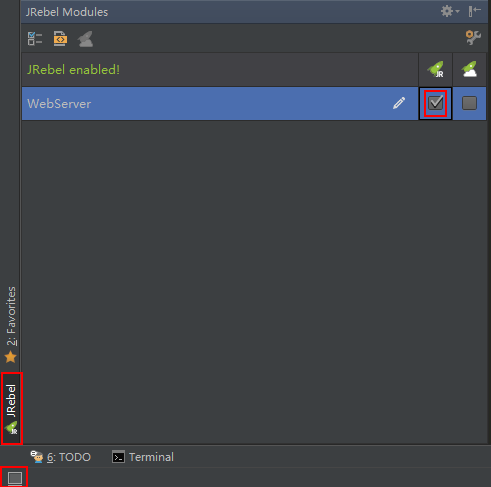
- 使用方法:在当前项目上右键 -> JRebel -> rebel.xml 来生成 rebel.xml 文件,或者在IntelliJ左下角,选择JRebel选项卡,将第一个勾上即可。(不做这步也可以)
- Run -> Edit Configurations…,设置On ‘Update action’ 和 On firame deactivation。
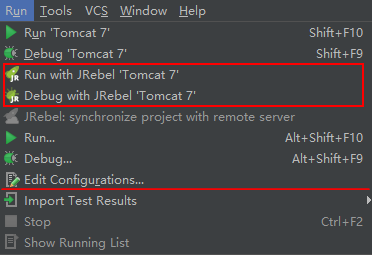
PS:官方文档里边给出的是分别设置为“Restart server”和“Do nothing”,但是需要手动编译才能自动部署。我推荐设置为如下图,当IDEA失去焦点的时候会自动编译并重新部署,更方便。
配置讲解
1.使用方法
- 总体的思路就是:下载官方的Eclipse插件 然后再指定javaagent等于破解版的jrebel.java路径
- 下载官方的Eclipse插件 在eclipse marketplace 里面下载 jrebel 我下载的是 6.几 忘了,直接下最近版的就Ok了 里面包含了三个基本的插件
- 破解版的jrebel.jar 网上自己搜索 很多 。解压后的目录为D:\jrebel
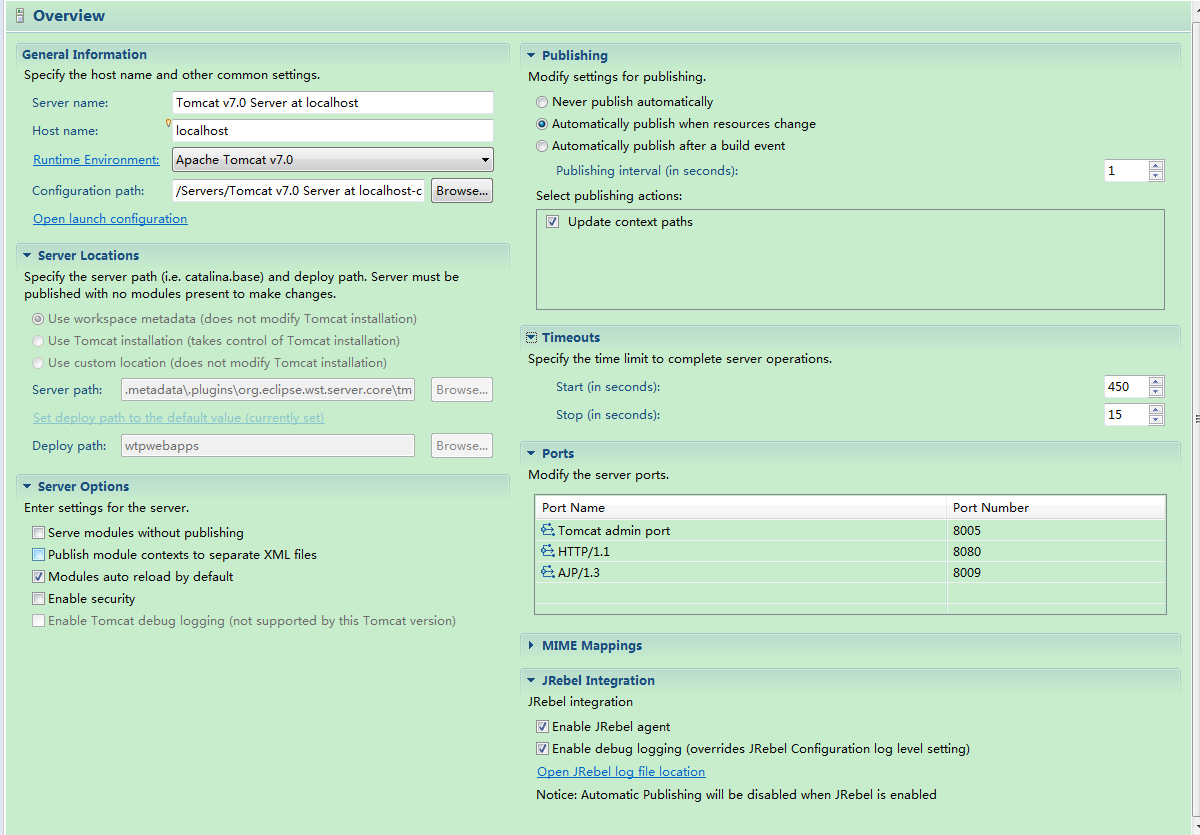
- 指定javaagent的值 看图 在就rebel config center 里面 在overview plug-ins advanced 一栏中 点击advanced 就会看到jrebel agent 选择other jrebel.jar 选择破解版jrebel.jar的位置

- 这一步还有另外一种更方便的思路,直接替换eclipse的plugins目录下,org.zeroturnaround.eclipse.embedder_6.4.1.RELEASE 这个目录下的所有jrebel.jar 这样就不用设置代理了,后面的路径也不用配置了,因为直接用的是默认的。
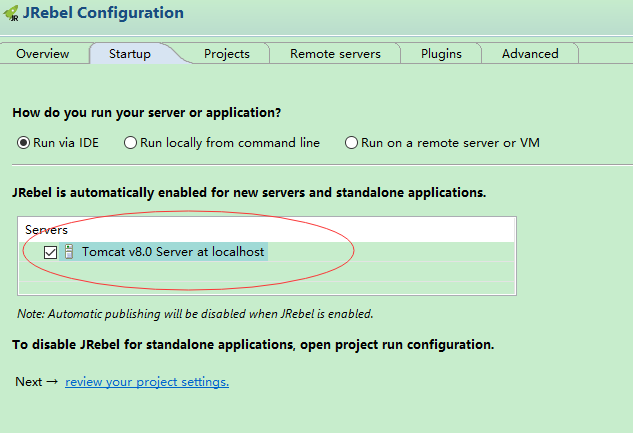
- 在overview中 选择好服务器类型 勾选服务器
- 在server中可以选择这两个选项,同时在tomcat的conf/server.xml 中将context的reloadable设为false。为true的时候 就是重启tomcat,这就会很不爽。
这里标注一下,以前我在网上看到别人都是说要把这个never publish sutomatically选择的,可是在我本机选择不自动发布后修改jsp页就不能重新加载了,选上Automatically
publish when resources change后jsp就可以和以前一样热加载了
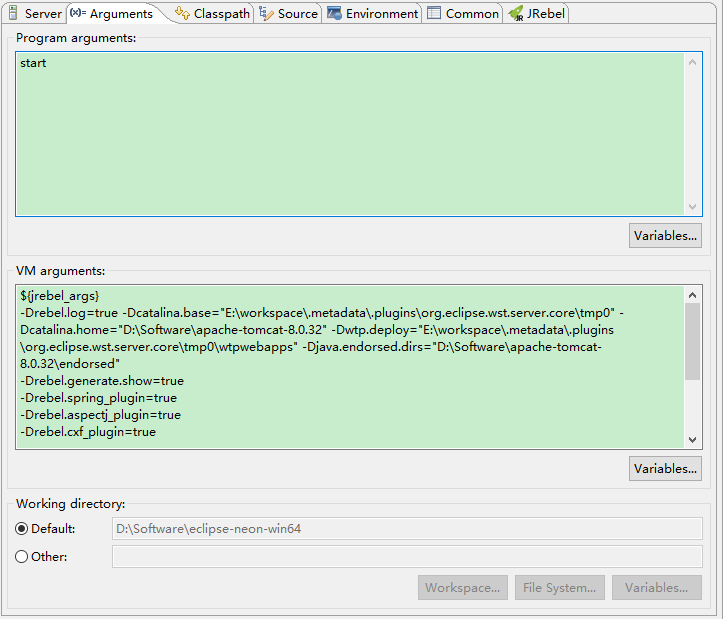
- tomcat启动时 参数的传入中设置tomcat 7的配置里叫做 Open launch configuration。!!!!
1
2
3
4
5
6
7
8
9
10
11
| ${jrebel_args}
-Drebel.generate.show=true
-Drebel.spring_plugin=true
-Drebel.aspectj_plugin=true
-Drebel.cxf_plugin=true
-Drebel.logback_plugin=true
-Drebel.mybatis_plugin=true
-javaagent:D:\Software\jrebel6\jrebel.jar
-noverify -XX:PermSize=128M -XX:MaxPermSize=512M
-Drebel.log=d\:\\jrebel\\jrebel.log
-Xms512m -Xmx1024m
|
也可以这样配置
1
2
3
4
5
6
7
8
9
10
11
12
13
14
| -noverify
-Djavaagent:C:\jrebel6\jrebel.jar
-DXbootclasspath/p:D:\jrebel6\rebelboot.jar
-Drebel.generate.show=true
-Drebel.spring_plugin=true
-Drebel.aspectj_plugin=true
-Drebel.cxf_plugin=true
-Drebel.logback_plugin=true
-Drebel.mybatis_plugin=true
-Xdebug -Djava.compiler=NONE -DXrunjdwp:transport=dt_socket,address=8787,server=y,suspend=n
-Drebel.dirs=E:\workspace\shop-server\mmarket-server\target\classes
-Dmmarket-server.root=E:\workspace\shop-server\mmarket-server
-Drebel.disable_update=true
-XX:PermSize=128M -XX:MaxPermSize=512M -Xms512m -Xmx1024m
|
- 将特定的project添加jrebel nature选中project 右击 选择jrebel 选择
add jrebel nature 就会生成一个文件rebel.xml 里面配置着 jrebel对当前project监控的路径 然后里面有${}包含的参数 这个是在jrebel config center 里面 查看
2.注意
- tomcat需配置自动加载资源, 最好以debug方式启动
- 当一个项目使用maven多模块开发时通过上面的配置, 只能自动加载webapp所在的模块, 若想改动其他模块的代码也要自动加载, 需在项目的跟pom中加入下面的配置:
1
2
3
4
5
6
7
8
9
10
11
12
13
14
15
16
17
18
19
| <plugin>
<groupId>org.zeroturnaround</groupId>
<artifactId>jrebel-maven-plugin</artifactId>
<version>1.1.5</version>
<configuration>
<addResourcesDirToRebelXml>true</addResourcesDirToRebelXml>
<alwaysGenerate>true</alwaysGenerate>
<showGenerated>true</showGenerated>
</configuration>
<executions>
<execution>
<id>generate-rebel-xml</id>
<phase>process-resources</phase>
<goals>
<goal>generate</goal>
</goals>
</execution>
</executions>
</plugin>
|
3.JRebel使用说明
- 项目下的src/rebel.xml文件配置的是JRebel的监控路径,如果使用不正常,请确认一下这个文件里边配置的路径是否正确。
启动项目,如果提示类似以下信息,说明JRebel运行正常:
1
2
3
4
5
6
7
8
9
10
11
12
13
14
| 2016-08-29 15:05:09 JRebel:
2016-08-29 15:05:09 JRebel:
2016-08-29 15:05:09 JRebel: JRebel Agent 6.4.8 (201608161142)
2016-08-29 15:05:09 JRebel: (c) Copyright ZeroTurnaround AS, Estonia, Tartu.
2016-08-29 15:05:09 JRebel:
2016-08-29 15:05:09 JRebel: Over the last 1 days JRebel prevented
2016-08-29 15:05:09 JRebel: at least 25 redeploys/restarts saving you about 0.4 hours.
2016-08-29 15:05:09 JRebel:
2016-08-29 15:05:09 JRebel: License acquired from License Server: http://idea.lanyus.com
2016-08-29 15:05:09 JRebel:
2016-08-29 15:05:09 JRebel: Licensed to skyheng.
2016-08-29 15:05:09 JRebel:
2016-08-29 15:05:09 JRebel:
2016-08-29 15:05:09 JRebel:
|
在Maven下使用
1
2
3
4
5
6
7
8
9
10
11
12
13
14
15
16
17
18
19
20
21
22
23
24
25
26
27
28
29
30
31
32
33
34
35
36
37
38
39
40
41
42
43
44
45
46
47
48
49
50
51
52
53
54
55
56
57
58
59
60
61
62
63
64
65
66
67
68
69
70
71
72
73
74
75
76
| <plugins>
<plugin>
<groupId>org.apache.maven.plugins</groupId>
<artifactId>maven-compiler-plugin</artifactId>
<version>2.3.2</version>
<configuration>
<source>1.7</source>
<target>1.7</target>
</configuration>
</plugin>
<plugin>
<groupId>org.mortbay.jetty</groupId>
<artifactId>jetty-maven-plugin</artifactId>
<version>7.2.2.v20101205</version>
<configuration>
<webAppConfig>
<contextPath>/${project.artifactId}</contextPath>
<extraClasspath>../data-service/target/classes</extraClasspath>
</span>
</webAppConfig>
<scanTargets>
</scanTargets>
<scanTargetPatterns>
<scanTargetPattern>
<directory>src</directory>
<includes>
<include>**/*.java</include>
<include>**/*.properties</include>
</includes>
</scanTargetPattern>
</scanTargetPatterns>
<scanIntervalSeconds>0</scanIntervalSeconds>
<webAppSourceDirectory>${basedir}/src/main/webapp</webAppSourceDirectory>
</configuration>
</plugin>
<plugin>
<groupId>org.zeroturnaround</groupId>
<artifactId>jrebel-maven-plugin</artifactId>
<version>1.1.5</version>
<executions>
<execution>
<id>generate-rebel-xml</id>
<phase>process-resources</phase>
<goals>
<goal>generate</goal>
</goals>
</execution>
</executions>
<configuration>
<rebelXmlDirectory>${basedir}/src/main/webapp/WEB-INF/classes</rebelXmlDirectory>
</configuration>
</plugin>
</plugins>
<outputDirectory>${basedir}/src/main/webapp/WEB-INF/classes</outputDirectory>
|
Maven插件
1
2
3
4
5
6
7
8
9
10
11
12
13
14
| <plugin>
<groupId>org.zeroturnaround</groupId>
<artifactId>jrebel-maven-plugin</artifactId>
<version>1.1.5</version>
<executions>
<execution>
<id>generate-rebel-xml</id>
<phase>process-resources</phase>
<goals>
<goal>generate</goal>
</goals>
</execution>
</executions>
</plugin>
|
下载地址
JRebel6.4.3版本
资料
| 个人微信公众号 | 技术交流QQ群 |
|---|
 |
 |