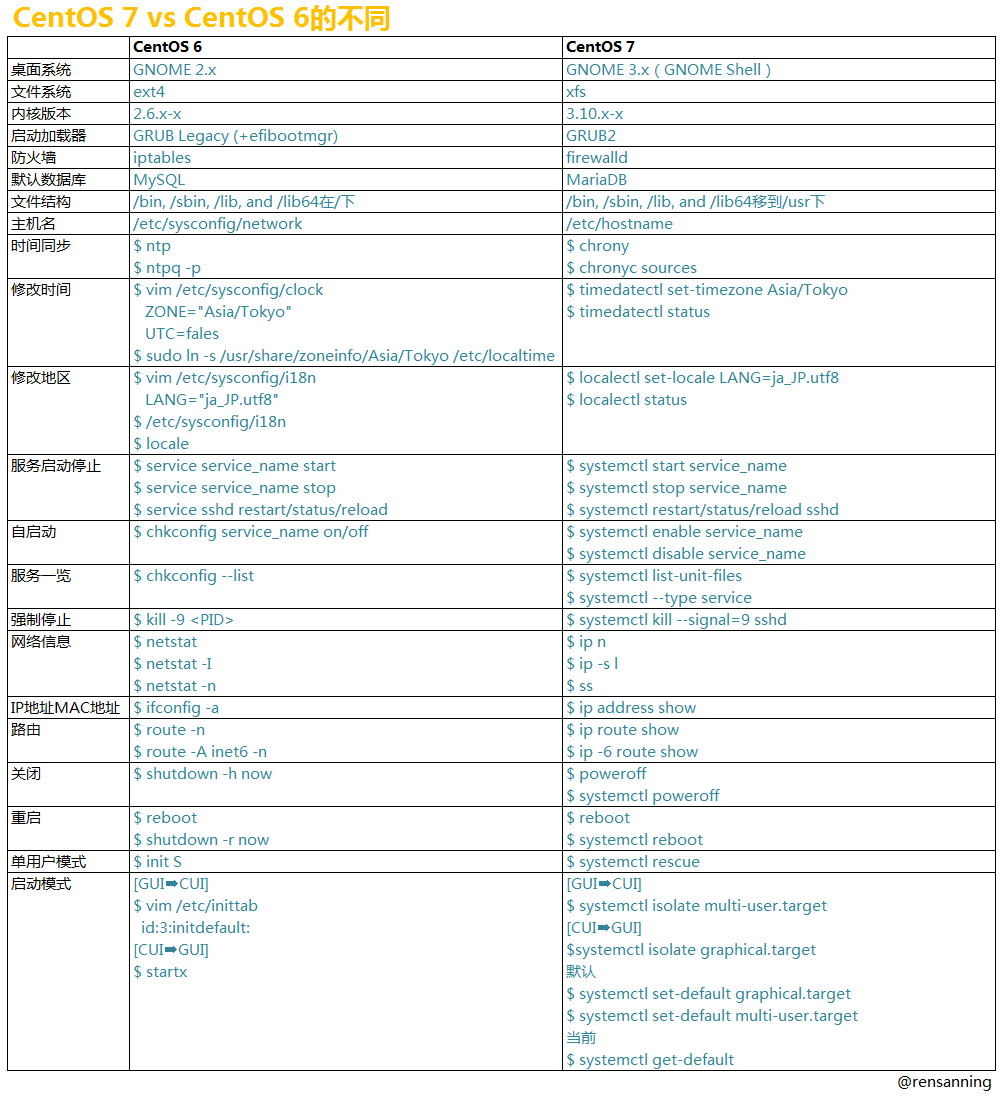
最近又安装了CentOS7.4的系统,之前一直在想CentOS6与CentOS7又那些差别呢?为什么新的CentOS7都出来这么久了,还是会有人喜欢使用低版本的系统呢?
总体差异
想装回过去的一些工具
- 安装:
yum install -y tree net-tools bind-utils tree sysstat vim-en* lrzsz NetworkManager-tui ntp ntpdate iftop tcpdump telnet traceroute
查看版本号/主机名
cat /etc/redhat-releasecat /etc/hostname
网络配置
- 由于前面虚拟机中安装 CentOS 使用的是桥接模式,为了让虚拟机中的系统能上网,我们需要进行网络设置。
CentOS 6设置方法
界面化下设置网络(我就是使用这种)
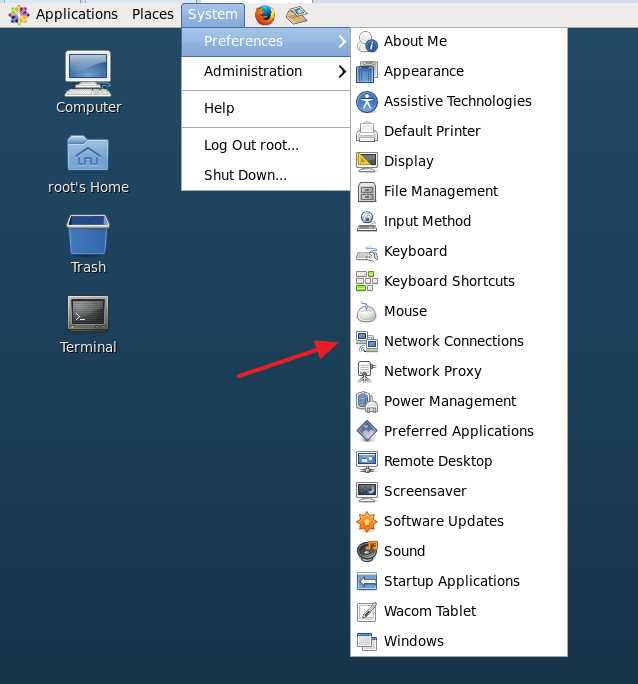
- 选择上图箭头所示

- 如上图标注 3 所示:选择
手动模式 - 如上图标注 4 所示:填写自己局域网内的子网掩码、默认网关,以及你要分配的内网 IP 地址。这三个参数你可以参考你当前使用的主机信息,在 Windows 系统上使用:
cmd --- ipconfig,查看你当前连接的网卡信息。如果你是无线网卡则读取对应的无线网卡信息,如果你是本地连接,则读取对应的本地连接信息。 - 如上图标注 5 所示:填写你当前地区合适的 DNS 地址,我这边地区使用 360 测试出来的结果显示 114 的适合我,所以我这里填写该值
命令行下设置网络
- 编辑网卡信息:
- 备份:
cp /etc/sysconfig/network-scripts/ifcfg-eth0 /etc/sysconfig/network-scripts/ifcfg-eth0-20160205Back - 把备份文件移动到其他目录:
mv /etc/sysconfig/network-scripts/ifcfg-eth0-20160205Back /opt/myBack - 编辑网卡文件:
vim /etc/sysconfig/network-scripts/ifcfg-eth0 - 把网卡中信息改为下面对应内容:
1 | DEVICE=eth0 (系统默认值) |
- 重启网络配置:
service network restart
CentOS 7设置方法
命令行下设置网络
- 查看系统下有哪些网卡:
ls /etc/sysconfig/network-scripts/,新版本不叫 eth0 这类格式了,比如我当前这个叫做:ifcfg-ens33(你的肯定跟我不一样,但是格式类似) - 编辑该文件:
vim /etc/sysconfig/network-scripts/ifcfg-ens33,改为如下信息:(IP 段自己改为自己的网络情况)
1 | TYPE=Ethernet |
- 修改后,重启网络服务:
systemctl restart network.service
图形界面的关闭与开启
- 本地开多个虚拟机,为了节省资源,关掉图形界面更好点
CentOS 6 设置方法
- 编辑配置文件:
vim /etc/inittab - 把默认值:
id:5:initdefault:,改为:id:3:initdefault: - 重启系统:
reboot,重启后就只有 shell 界面了。 - 在 shell 界面中如果你还希望临时开启图形界面可以输入:
init 5 - 在图形界面中如果你希望临时关闭图形界面可以输入:
init 3
CentOS 7 设置方法
- 关闭图形
mv /etc/systemd/system/default.target /etc/systemd/system/default.target.bak(改名备份)ln -sf /lib/systemd/system/multi-user.target /etc/systemd/system/default.target(重新软连接文本界面为启动默认值界面)systemctl reboot(重启)- 恢复图形界面
rm -rf /etc/systemd/system/default.target(移除当前配置链接)mv /etc/systemd/system/default.target.bak /etc/systemd/system/default.target(恢复备份配置链接)systemctl reboot
systemctl 的用法
- 相当于 CentOS 6 的:service nginx stop
systemctl is-enabled iptables.service#查询服务是否开机启动systemctl enable iptables.service#开机运行服务systemctl disable iptables.service#取消开机运行systemctl start iptables.service#启动服务systemctl stop iptables.service#停止服务systemctl restart iptables.service#重启服务systemctl reload iptables.service#重新加载服务配置文件systemctl status iptables.service#查询服务运行状态systemctl --failed#显示启动失败的服务systemctl list-units --type=service#查看所有服务systemctl is-enabled httpd#查看httpd服务是否开机启动- 对于启动脚本的存放位置,也不再是
/etc/init.d/(这个目录也是存在的),而是/usr/lib/systemd/system/
开放端口
- 添加端口:
firewall-cmd --zone=public --add-port=8883/tcp --permanent - 重启防火墙:
firewall-cmd --reload- 命令解释:
--zone#作用域--add-port=80/tcp#添加端口,格式为:端口/通讯协议--permanent#永久生效,没有此参数重启后失效
- 列出所有端口列表:
firewall-cmd --list-all
关闭 firewall 使用 iptables
- 关闭 firewall
systemctl stop firewalld.service#停止firewallsystemctl disable firewalld.service#禁止firewall开机启动
- 安装 iptables
yum install -y iptables-services
- 启动 iptables
systemctl restart iptables.service#最后重启防火墙使配置生效systemctl enable iptables.service#设置防火墙开机启动- 其他使用照旧
ifconfig 没有了
- 查看网络配置:
ip a - 装回 ifconfig:
yum install -y net-tools
设置时区
timedatectl set-timezone Asia/Shanghaitimedatectl status

