本文将讲解 Hexo博客的常用插件、站点 SEO 等内容!

主题优化
主题配置介绍
我这里只讲自己在使用的 yelle 主题,你可以参考下,可能还有一些改动我后续会自己在慢慢改,但是大体基本也就这样了。
从中我们也可以看出,对于主题来讲,大部分可以配置的地方其实都是在这里的,所以对于主题的使用者来讲,懂这里很重要。
- 基本上主题的配置文件都是有内容改,但是下面这几点我觉得特别重要:
duoshuo,如果你是打算采用多说评论系统的话,你需要设置这里,但是我个人对多说没好印象youyan,有言也是国内实用比较多的评论系统之一,个人感觉相对比较稳定open_in_new,我个人觉得这个东西就应该是 true,不是用新标签的都是坏人baidu_tongji,我个人使用的是百度统计,具体百度统计的使用可以查看百度统计官网:http://tongji.baidu.com
我的 yelle 主题配置
- Yelee 主题使用说明:http://moxfive.coding.me/yelee/
1 | # Theme Version | 当前版本 |
常用页面添加
404、关于我、标签页
- 还是以上一篇文章我们讲解的项目根目录上:E:\blog_space\hexo,在该目录启动 Git Bash:
- 新增一个 404 页面:
hexo new page 404 - 新增一个 about 页面:
hexo new page about - 新增一个 tag 标签云页面:
hexo new page tags - 新增一个 robot.txt 文件,把该文件放在:E:\blog_space\hexo\source 目录下,如果你没有该文件可以到我的项目上找:https://github.com/chenjh0611/chenjh0611.github.io
- robot 文件内容:
1 | User-Agent: * |
在md文件的Front-matter区域添将comments设置为flase的话,将不会展示评论界面。
设置分类
在我们编辑文章的时候,直接在categories:项填写属于哪个分类,但如果分类是中文的时候,路径也会包含中文。 比如分类我们设置的是:
categories: 编程 那在生成页面后,分类列表就会出现编程这个选项,他的访问路径是:*/categories/编程
如果我们想要把路径名和分类名分别设置,需要怎么办呢?
打开根目录下(并非主题目录)的配置文件_config.yml(别打开错了),找到如下位置做更改(设置种类):
1 | # Category & Tag |
在这里category_map:是设置分类的地方,每行一个分类,冒号前面是分类名称,后面是访问路径。 可以提前在这里设置好一些分类,当编辑的文章填写了对应的分类名时,就会自动的按照对应的路径来访问。
置顶文章方法
- 参考:
- 编辑这个文件:
node_modules/hexo-generator-index/lib/generator.js在生成文章之前进行文章top值排序。 - 覆盖原文件内容,采用下面内容:
1 | ; |
- 然后在文章头部的:Front-matter位置加上一个:
top: 1000的内容。数值越大,越靠前
另外一种解决方案:
- hexo博客优化之文章置顶+置顶标签
文章中卸载hexo-generator-index使用cnpm install --save hexo-generator-index-pin-top插件来实现,安装这个插件然后在需要置顶的文章的Front-matter中加上top: true即可,也可以是数值,数值越大,越靠前
字数统计和阅读时长
Next 是已经集成了这个功能,所以还是得需要咱们自己完成,首先看一下官网的使用帮助hexo-wordcount.
集成步骤
- 先安装插件
hexo-wordcount、执行cnpm install --save hexo-wordcount安装 - 文件配置、在
yelee/layout/_partial/post/word.ejs下创建word.ejs文件:
1 | <div style="margin-top:10px;"> |
- 然后在
themes/yelee/layout/_partial/article.ejs文件中<%- partial('post/title', {class_name: 'article-title'}) %>后面添加如下代码
1 | <% if(theme.word_count && !post.no_word_count){ %> |
- 在
<div class="article-info article-info-post">后添加如下代码
1 | <% if(theme.word_count && !post.no_word_count){ %> |
- 在主题
_config.yml中配置word_count是否需要添加字数统计功能控制的flag、在md文件的Front-matter区域添加no_word_count为true即配置文章不需要显示字数统计功能
article.ejs文件中代码块示例
1 | <% if (post.link || post.title){ %> |
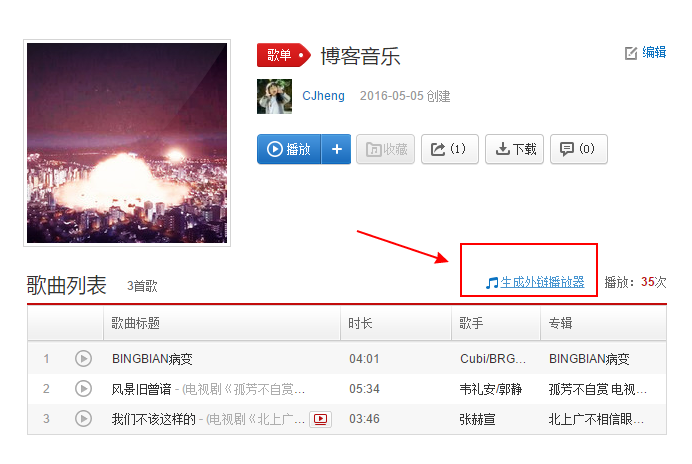
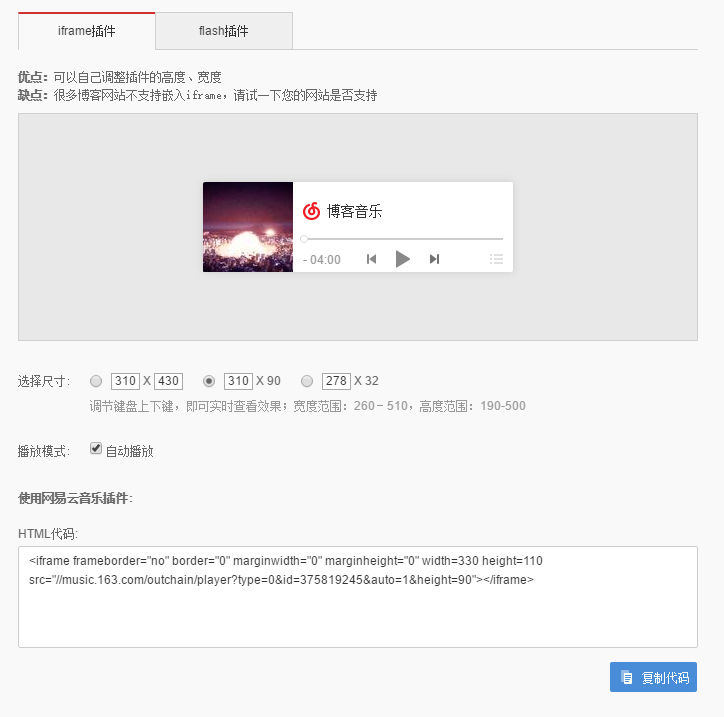
网易云音乐
鼠标点击效果
废话不多说,直接看如何集成。 拷贝需要的文件、进入到下位子的Github,拷贝文件。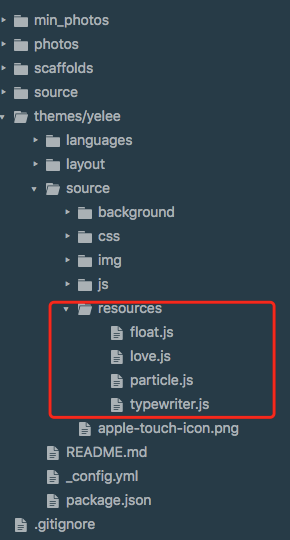
拷贝resources下的所有文件到您对应的目录。
打开themes/yelee/layout/_partial/after-footer.ejs文件,添加刚刚添加文件的配置。
1 | <% if (theme.background_animation){ %> |
压缩页面静态资源
为什么要压缩页面静态资源
- 对于个人博客来说,优化页面的访问速度是很有必要的,如果打开你的个人站点,加载个首页就要十几秒,页面长时间处于空白状态,想必没什么人能够忍受得了吧。我个人觉得,如果能把页面的加载时间控制在三四秒内,就很不错了。
那么怎么提高hexo这个静态博客的页面加载速度呢?可以从以下的几个方面去入手:
- 将js文件尽可能放置到body的闭合标签之前,因为在加载或者引入js文件时是阻塞式的,如果我们在页面的最开始就引入这些js文件,而这些文件又比较大,会造成页面在渲染时长时间处于白屏状态。
- 尽量避免去引用访问速度非常低下的cdn或者图片,可以改用访问速度更快的cdn,或者将难以迅速加载的图片保存到自己的站点目录下,以免在加载图片时耗费了大量的时间,最后还加载不出来。
- 对页面的静态资源进行压缩,包括css、js和html等文件。我们自己添加的css和js文件为了可读性,往往会有很多换行和空格,这些对于浏览器来说并没什么卵用,甚至还会降低渲染页面的速度。至于html文件,由于Markdown转成html的bug,会导致页面存在大量的空白,如果你查看下页面的源代码,就会发现这些大量的空白符,十分难看。这也会造成页面渲染的性能问题。
- 项目压缩也叫
代码丑化, 分别对 html、css、js、images进行优化,即把重复的代码合并,把多余的空格去掉,用算法把 images 进行压缩。压缩后的博客,加载速度会有较大的提升,自然能留住更多游客。
hexo的压缩静态资源插件
蛮多朋友使用了gulp对博客进行压缩,这也是一个办法,但在社区逛了下,找到了一个比较好用的模块hexo-all-minifier,这个模块集成了对 html、css、js、image 的优化。安装上此模块后,只要在根目录下的_config.yml文件中加上如下字段就可对博客所有内容进行压缩。
1 | html_minifier: |
上面这做法是使用gulp来进行压缩,gulp是Node.js下的自动构建工具,通过一列的task执行步骤进行自动流程化处理。
使用这种方法会比较麻烦,每次压缩时还需要输入额外的命令,比较繁琐,个人不是很喜欢,有兴趣的可以去自己了解下相关的东西。这篇教程里很多详细的说明,里边有说到gulp的使用,绝对的精品文章。
这里我选择的是由rozbo大佬开发的hexo-neat压缩插件,配置简单,无需额外命令,你只要使用原本的调试三连或者部署三连就可以自动帮你完成静态资源的压缩!
如何使用hexo-neat
在站点根目录下安装hexo-neatnpm install hexo-neat --save
为站点配置文件添加相关配置
下边是我自己站点的相关配置,直接添加到站点配置文件_config.yml的末尾就可以。可以安装自己的需求去自定义配置,不过有些注意事项,可以参考我后文的踩坑记录。
1 | # hexo-neat |
hexo-neat插件踩坑记录
由于在使用hexo-neat插件时,可以在命令窗口中看到各个文件的压缩率,于是我就开始捣鼓跳过哪些文件可以让效率更高。在鼓捣了一段时间之后,记录下使用该插件的一些注意事项,避免日后重蹈覆辙,也希望能对各位看官有所帮助。
跳过压缩文件的正确配置方式
如果按照官方插件的文档说明来配置exclude,你会发现完全不起作用。这是因为配置的文件路径不对,压缩时找不到你配置的文件,自然也就无法跳过了。你需要给这些文件指定正确的路径,万能的配置方式如下:
1 | neat_css: |
压缩html时不要跳过.md文件
.md文件就是我们写文章时的markdown文件,如果跳过压缩.md文件,而你又刚好在文章中使用到了NexT自带的tab标签,那么当hexo在生成静态页面时就会发生解析错误。这会导致使用到了tab标签的页面生成失败而无法访问。
当初为了找到这个原因花了我两个晚上的时间,简直是夜不能寐。
压缩html时不要跳过.swig文件
.swig文件是模板引擎文件,简单的说hexo可以通过这些文件来生成对应的页面。如果跳过这些文件,那么你将会发现,你的所有页面完全没有起到压缩的效果,页面源代码里依然存在着一大堆空白。
参考链接
文章链接唯一化
也许你会数次更改文章题目或者变更文章发布时间,在默认设置下,文章链接都会改变,不利于搜索引擎收录,也不利于分享。唯一永久链接才是更好的选择。
- hexo-abbrlink介绍:https://post.zz173.com/detail/hexo-abbrlink.html、GitHub地址:hexo-abbrlink
安装:cnpm install hexo-abbrlink --save
在站点配置文件中查找代码permalink,将其更改为:permalink: posts/:abbrlink/ # posts/可自行更换
这里有个知识点:
百度蜘蛛抓取网页的规则: 对于蜘蛛说网页权重越高、信用度越高抓取越频繁,例如网站的首页和内页。蜘蛛先抓取网站的首页,因为首页权重更高,并且大部分的链接都是指向首页。然后通过首页抓取网站的内页,并不是所有内页蜘蛛都会去抓取。
搜索引擎认为对于一般的中小型站点,3层足够承受所有的内容了,所以蜘蛛经常抓取的内容是前三层,而超过三层的内容蜘蛛认为那些内容并不重要,所以不经常爬取。出于这个原因所以permalink后面跟着的最好不要超过2个斜杠。
- 然后在
站点配置文件中添加如下代码:
1 | # abbrlink config |
可选择模式:
- crc16 & hex
- crc16 & dec
- crc32 & hex
- crc32 & dec
示例:
生成的链接如下所示:
1 | crc16 & hex |
生成完后,原md文件的Front-matter 内会增加abbrlink 字段,值为生成的ID 。这个字段确保了在我们修改了Front-matter 内的博客标题title或创建日期date字段之后而不会改变链接地址。
1 | --- |
如果文章中未指定
abbrlink: xxx,将会根据算法随机生成数字
这样就确保了博文链接的唯一化,只要不修改 md 文件的 abbrlink 的值,url 就永久不会改变。如此 md 文件名和文件内容也可以随便改了。这样也有利于 SEO 优化。
畅言实现评论
畅言去广告:https://www.cgtblog.com/jishu/3251.html
Yelog—对Yelee主题的改进
由于Yelee主题存在代码块上下出现空格的情况以及主题布局尺寸固定的情况,Yelog主题对Yelee主题进行了改进,github地址如下:
https://github.com/yelog/hexo-theme-yelog
使用Yilia主题需要
- 在查看所有文章的时候需要
1、请确保node版本大于6.2
2、在博客根目录(注意不是yilia根目录)执行以下命令:npm i hexo-generator-json-content –save
3、在根目录_config.yml里添加配置:
1 | jsonContent: |
显示pdf的支持
- 安装:
cnpm install --save hexo-pdfgithub地址:hexo-pdf - 使用示例:
插件推荐
插件的基本使用命令
- 插件官网:https://hexo.io/plugins/
- 安装插件:
npm install 插件名 --save - 卸载插件:
npm uninstall 插件名 - 更新插件和博客框架(需要在 E:\blog_space\hexo 目录下):
npm update - 它实质上是通过项目根目录下 package.json 文件更新各大组件
必备插件
- 支持RSS:
cnpm install hexo-generator-feed --save - 生成站点地图:
cnpm install hexo-generator-sitemap --save - 生成百度站点地图:
cnpm install hexo-generator-baidu-sitemap --save - HTML 压缩:
cnpm install hexo-html-minifier --save - JavaScript 压缩:
cnpm install hexo-uglify --save - CSS 压缩插件:
cnpm install hexo-clean-css --save - SEO优化:
cnpm install hexo-generator-seo-friendly-sitemap - 站内搜索:
hexo-generator-search插件为 Hexo3 提供搜索功能。 安装:cnpm install hexo-generator-search --save
其他插件支持
| 命令 | 功能 | 文档 |
|---|---|---|
| npm install hexo-generator-index-pin-top –save | 文章置顶插件 | 点我 |
| npm uninstall hexo-generator-index –save | 文章置顶插件 | 点我 |
| npm i –save hexo-wordcount | 文章字数+阅读时长统计 | 点我 |
| npm install hexo-baidu-url-submit –save | 百度链接主动推送 | 点我 |
| npm install hexo-deployer-ftpsync –save | hexo上传至FTP服务器 | 点我 |
| npm install hexo-deployer-cos –save | hexo上传至腾讯云COS | 点我 |
| npm install hexo-deployer-aliyun –save | hexo上传至阿里云 | 点我 |
| npm install –save hexo-admin | hexo管理插件 | 点我 |
| hexo-blog-encrypt(请看文档) | hexo文章加密码 | 点我 |
| 卜算子ip计数统计 | IP计数统计 | 点我 |
| npm install leancloud-storage –save | Valine评论 | 点我 |
| Valine评论邮件通知 | Valine评论提醒 | 点我 |
| hexo-qiniu-sync | 七牛云图片同步 | 点我 |
搜索引擎提交网址大全
结束语
- 真心希望这是 Hexo 最后一篇,因为我们只是要安心写东西而已,不需要太多折腾。
参考资料
系列博文整理
整理了下hexo系列的文章,发现这位博主写系列博客感觉还是很棒的:

